|
|
|
|
Selecting Objects
Before you can perform any type of editing or transforming operation on an object, you need to select it. As well as selecting objects using the cursor, Bryce's Selection tools let you select objects by type or family. You can also cycle through all the objects in your scene.
To select an object:
- Click on any object. A selected object's wireframe will appear red.
or- Drag a marquee around the object.
To step through all the objects in your scene:
To select a number of objects:
To select an object within a group:
To select all objects:
To deselect all:
To add objects to a selection:
To remove objects from a selection:
To select obscured objects:
1 Hold down the Shift key and select through the obscuring object.
All objects underneath the cursor will be selected. If the obscuring object is already selected, it will be deselected and all the objects behind it will be selected.
or
Hold down Command/Ctrl and click an object to select or deselect. Use Shift to select multiple objects.You will see a list of all objects under the cursor. This lets you not only view the selection status of all the listed objects, but change it as well. This aids in dealing with large scenes.
The Selection Palette
The Selection palette is hidden behind the Animation controls in Bryce's default state. The palette is divided into two sections: select by type tools and the VCR controls.
The Selection palette has tools for selecting objects in a variety of ways.
To display the Selection palette:
- Click the Time Selection Palette toggle in the lower-right corner of the Working window. The Selection palette appears.
Selecting By Object Type
The Select by Type icons let you select all the objects in your scene that are of a particular type. For instance, if you click on a sphere here, Bryce will select all spheres and sphere-derivative objects in your scene.
All of the selection controls below respect the previously described Shift-click techniques for multiple selections and deselections.
To select a specific object by type:
- Hold down the cursor over the tool for the type of object you want to select and choose the name of the object from the menu that appears.
By default, objects will be named with the object type followed by a sequential number based on when you placed that object in the scene; for example, Sphere 1. To make it easier to select a particular object, you can give objects unique names that will appear in this menu. Refer to "Naming Objects" for more on naming objects.
To select objects by family:
To select Mesh objects:
To select Path objects:
To select Group objects:
To select all objects except a specific type:
1 Click the tool for the object you want to exclude from the selection. All the objects of that type are selected.
2 Click the triangle icon in the Selection palette and choose Select Inverse from the menu.
To select all the objects in your scene:
The VCR Controls
The VCR controls let you step through the various selection tools and activate Solo Mode.
To display the VCR Controls:
1 Click the Time Selection Palette toggle in the lower-right corner of the Working window. The Selection palette appears.
2 Pass your cursor over the right side of the Selection palette. The VCR Controls appear.
To step forward and backward through the object types in your scene:
1 Click on the larger forward arrow to step forward through object types within the current scene. The first object of its type is selected.
2 Click on the larger backward arrow to step back through object types.
If you watch the Select By Type icons, the object type you are stepping to will highlight momentarily.
To step forward and backwards through the object in a selected object type:
1 Click on the smaller forward arrow to step forward through each object of the type in a selection.
For example, you can use the large arrows to step to the first sphere created in your scene, and then the smaller arrows to step through all other spheres in your scene.
2 Click the smaller backward arrow to step backward through each object of the type in a selection.
One advantage to making selections with this technique is that you can select objects within a Group. Simply clicking on a Grouped object will not necessarily select the entire group; using the VCR controls to select within a Group allows you to reposition objects, or assign textures to objects within a Group without having to first Ungroup them.
To step sequentially through every object in your scene:
1 Click the triangle icon in the Selection palette and choose Alternate VCR Mode.
2 Click the larger backward or forward arrow.
To step sequentially through families:
1 Click the triangle icon in the Selection palette and choose Alternate VCR Mode.
2 Click the smaller backward or forward arrow.
To temporarily remove all unselected objects from the scene:
2 Click the Solo Mode button in the center of the VCR controls. The button color changes to red.
In Solo Mode, you can only edit the selected objects; all the other objects remain in place but uneditable.
If you're working on a very complex scene, Solo Mode speeds up your work significantly, as Bryce does not have to calculate and draw extraneous wireframe objects.
The Object Attributes Dialog
The Object Attributes dialog lets you set a number of properties that determine how the object appears in the Working window.
The dialog is where you'll set up the object's name, size, orientation, placement and display quality. It's most often used to numerically transform the object. When you're animating an object, the dialog is used to control how the object interacts with its motion path. Refer to "Animating" for more on animating.
The dialog is divided into three tabs: General, Linking, and Animation.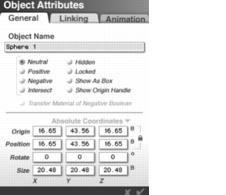
The General tab contains controls for setting the object's name and display attributes and position. Refer to "Editing Object Attributes" for more on using the dialog to edit objects.
The Linking tab contains controls for setting up parent-child links and tracking. Refer to "Linking Objects" for more on linking and "Tracking Objects" for more on tracking.
The Animation tab lets you set the properties of the object when it is connected to a Motion Path. Refer to "Animation and Motion Paths" for more on motion paths.
To display the Object Attributes dialog:
2 Click Objects menu> Attributes.
or
Click the A icon that appears next to an object's bounding box.Naming Objects
When you create an object, the first thing you should do is assign a name to it. An object's name identifies it in the Working window.
You can select objects, by name, using the Selection palette. The name can also help you distinguish a specific object when your scene contains more than one object of the same type. Refer to "Selecting Objects" for more information.
An object's name is also used when you're creating parent-child links and setting up object tracking.
To name an object:
 Corel Corporation http://www.corel.com Voice: (800) 772-6735 Fax: (716) 447-7366 www.corel.com/support |